Recent Updates on e-Invoicing:
10th May 2023
The 6th phase of e-invoicing has been announced by the CBIC, mandating businesses with a turnover of ₹5 crore or more in any financial year since 2017-18 to issue e-invoices from 1st August 2023. This move is part of the government’s efforts to shift towards a digital economy.
11 October 2022
As per the Goods and services tax; companies whose annual turnover is 5 crores may be applicable for e-invoicing from January 1, 2023.
16 August 2022
An important statement was made on August 16, 2022, by the Central Board of Indirect Taxes and Customs (CBIC), indicating that taxpayers whose annual turnover exceeds Rs. 10 crores are qualified to use the e-invoicing system.
4th July 2022
According to a government official, in order to lower the barrier from the existing Rs 20 crore, the government intends to make e-invoicing under gst mandatory for businesses with a turnover of Rs 10 crore and higher from 1-10-2022.
24th February 2022
According to Notification No. 1/2022, the e-Invoicing system will be made available to businesses with an annual turnover of more than Rs. 20 crore and up to Rs. 50 crore as of April 1, 2022.
30th June 2021
The CBIC has issued a notification proposing to waive the penalty imposed for non-compliance with dynamic QR code regulations for B2C invoices between December 1, 2020, and September 30, 2021.
1st June 2021
A government department and local authority are exempt from the e-invoicing system, according to CBIC’s Central Tax Notification No. 23, dated June 1, 2021.
30th March 2021
The CBIC has published a notification to waive the fine for failing to follow the rules for dynamic QR codes for B2C invoicing between 1 December 2020 and 30 June 2021, provided that the person in question complies with the notification’s requirements starting on 1 July 2021.
Electronic Invoicing (e-Invoicing) in Marg ERP Software
Overview of E-Invoicing in Marg ERP Software
Process of Registration & Login to E-Invoice Portal
Process of E-Invoicing in Marg ERP Software
OVERVIEW OF E-INVOICING IN MARG ERP SOFTWARE
- Electronic Invoicing (e-Invoicing) is a system in which Business-to-Business (B2B) invoices, Export invoices & Invoices of Credit/Debit Notes of Registered parties are validated electronically by GSTN for further use on the common GST portal.
- Through Generate e-Invoice option in Marg ERP Software, the user can easily upload their B2B, Credit & Export invoices on e-Invoice Portal after the registration process is completed.
- The main objective behind the introduction of e-Invoicing by the tax departments is to ease the whole process of invoicing i.e. to reduce all the reconciliation problems related to data and auto-populate the returns that will help the taxpayers to easily get the Input Tax Credit.
- It is mandatory for businesses whose turnover is 10 crores or above that, are required to upload their e-invoices on the GST portal.
- This is going to be applicable from 1st October 1, 2022.
PROCESS OF REGISTRATION & LOGIN TO E-INVOICE PORTAL
- In order to upload the invoices on eInvoice portal, the user needs to first register on eInvoice Portal.
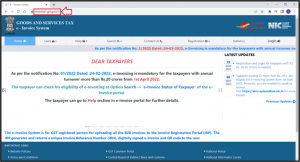
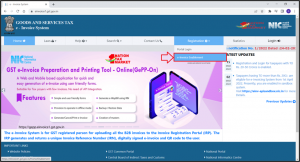
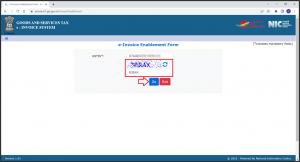
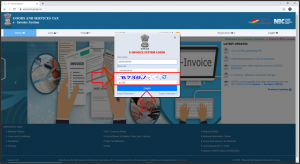
- Visit to einvoice1.gst.gov.in
- Click on Registration >> e-Invoice Enablement.
- An ‘e-Invoice Enablement Form’ will appear.
- The user will mention the ‘GSTIN’.
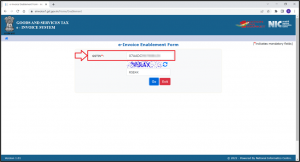
- Enter the ‘Captcha’ as shown.
- Then click on ‘Go’.
- The user can view the all the details in the form.
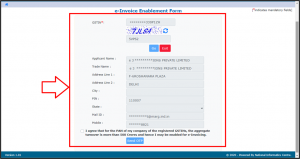
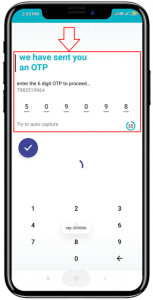
- Click on the check box (R) of ‘I agree that for the PAN…..for eInvoicing’and then click on ‘Send OTP’.
- An OTP will be sent to the Registered Mobile No.
- The user will enter the OTP in ‘Enter OTP’ field and then click on ‘Verify OTP’.

- In this way, the process of registration will get completed on e-Invoice Portal.
- Now the user will visit to the GST Portal. Click on ‘Login’.
- An ‘e-Invoice System Login’ window will appear.
- Enter the ‘Username’ and ‘Password’.
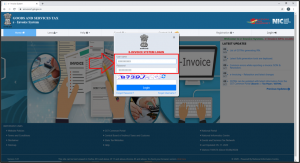
- Enter the ‘Captcha’ as shown here and then click on ‘Login’.
- A ‘Dashboard’ will appear.
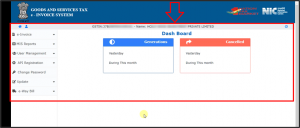
- Click on ‘API Registration’ from the left side icons given in the Dashboard’.
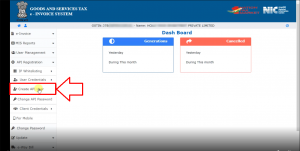
- Click on ‘Create API User’.
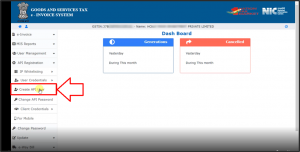
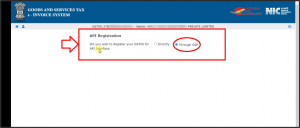
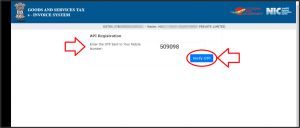
- An ‘API Registration’ window will appear.
- A message of ‘Do you wish to Register your GSTIN for API Interface-Directly or through GSP’ will appear.
- The use will tick the circle of ‘Through GSP’.
- As the user will tick the circle of ‘Through GSP’; some fields i.e. ‘Select your GSP, Username, Password and Re-enter Password’ will appear.
♣ Marg ERP has been collaborated with Master India Pvt. Ltd. & Pinnacle Finserve Advisors Pvt. Ltd. The user can do the registration through whichever company the user needs to do from both these companies.
- In‘Select your GSP’ field,the user will select‘Master India Pvt. Ltd’ OR’Pinnacle Finserve Advisor Pvt. Ltd.’as GSP as per the requirement.
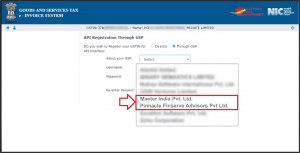
- Suppose select ‘Pinnacle Finserve Advisors Pvt Ltd.’.

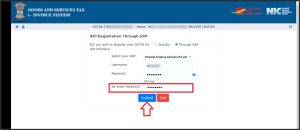
- Now the user will create the Username & Password as per the requirement.
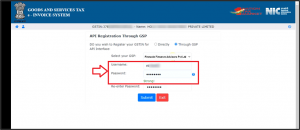
- Re-enter the Password.
- Then click on ‘Submit’ tab.
- The user will receive an ‘OTP’ on the registered mobile number.
- The user will fill that OTP and click on ‘Verify OTP’.
- A pop of message of ‘Account Created Successfully’ will appear.
- The user will click on ‘OK’.

- So, in this way the process of the portal will get completed.
PROCESS OF E-INVOICING IN MARG ERP SOFTWARE
♣ In Marg ERP Software, the user can easily upload single & bulk invoices on e-Invoice Portal.
- Go to GST >> GSTR Settings.
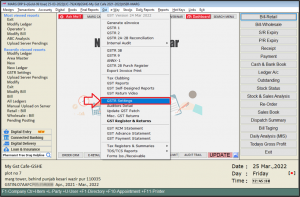
- A ‘GSTR Settings’ window will appear.
- Select ‘eInvoice Settings’.
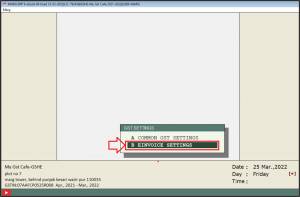
- An ‘eInvoice Settings’ window will appear with different fields.
a. eInvoice on F4 Key –Y, A-Ask, N-No: It means thatwhenever the user will create an invoice then the software will ask whether to upload the invoice on the portal or not.
So the user will set this field as ‘A’.
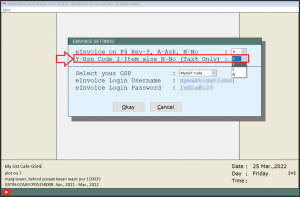
b. Y-HSN Code I-Item wise N-No (Tax% Only): It means that whether the user needs to HSN wise upload the invoice or invoices on the portal then set this field to ‘Y’.
If the user needs to Item wise upload the invoice or invoices on the portal, then set this field to ‘I’.
Suppose set this field to ‘Y’ i.e. HSN Code.

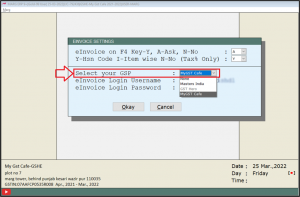
c. Select Your GSP: Select the GSP from the dropdown i.e. if the user has selected ‘Master India Pvt. Ltd.’ as a GSP and done the registrationthen set this field as‘Master India’.
And if the user hasdone the registration through ‘Pinnacle Finserve Advisors Pvt. Ltd.’, then set this field as‘My GST Cafe’.
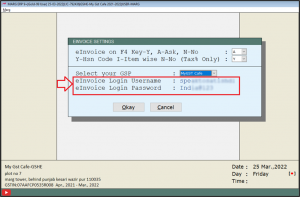
d. eInvoice Login Username & Password: Mention the Username and Password which is created at the time of API registration.
- Then click on ‘Okay’.
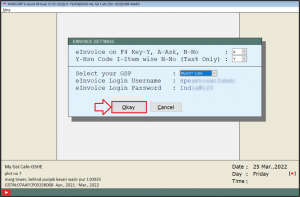
- And then come to the home screen of the software.
- Now go to GST >> Generate eInvoice.
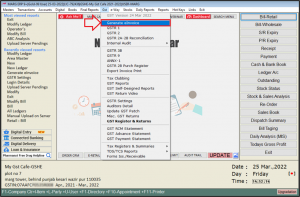
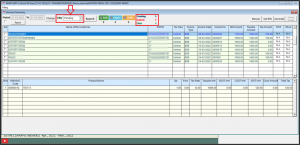
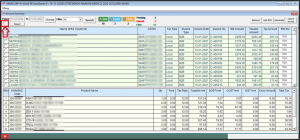
- An ‘eInvoice Summary’ window will appear through which the user can upload the invoices.
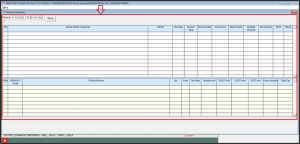
- In Period field, the user will mention the date i.e. from which date till which date the invoices needs to be viewed.
- Click on ‘Show’.
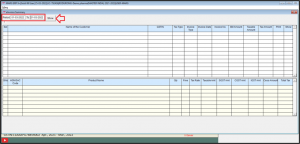
- The user can view all the pending invoices of B2B, Credit Note or Export(Invoice Type)will get displayed with proper details for the selected period e. GSTIN, Tax Type, Invoice Date, Invoice No., Bill Amount etc.
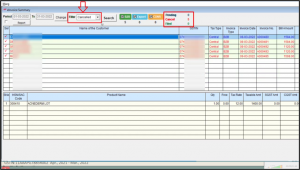
- The user can apply filter as per the requirement i.e. whether to view the Pending, Uploaded, Cancelled or All Invoices.
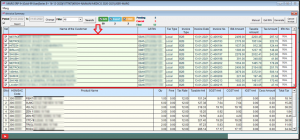
Suppose select ‘All’.
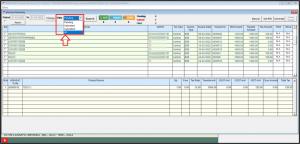
- The invoices which are already filled will be displayed with a ‘tickR’ sign and invoices which are not filled will be displayed as ‘Untick’.
- The user can select from 3 boxes (B2B, Export and CDNR)e. whether the user needs to view only B2B Invoices or Export invoices or Credit Note or all 3 of them.
- By default, all these 3 boxes are already selected but the user can select&deselect it as per the requirement.
- If the userselects ‘All’ in the filter then it will display the total number of B2B, Export& Credit Note Invoices along with the Pending, Cancel and Filed Invoices.
- So the number of invoices will get displayed according to the applied filtere.Pending, Uploaded, Cancelled or All.
A. Pending
B. Uploaded
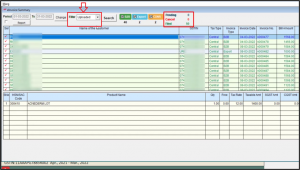
C. Cancelled
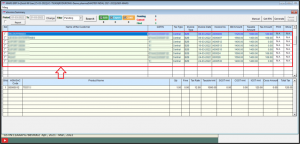
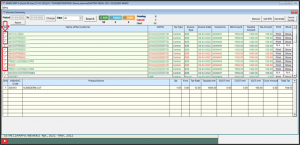
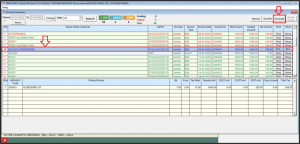
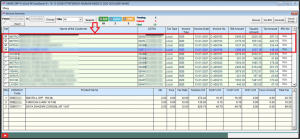
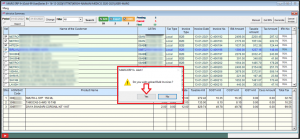
- Select an invoice which needs to be uploaded and then click on ‘Generate’ tab.
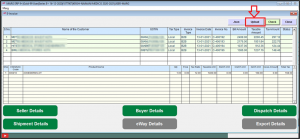
- An‘e-Invoice Generation’ window will appear with different parameters.
- Then can view the Transaction Details.
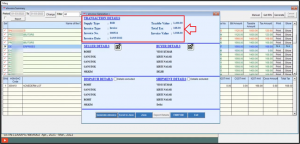
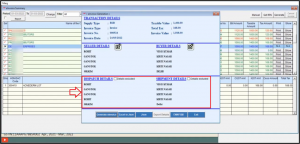
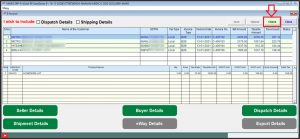
- The user can view & modify the Seller Details and Buyer Details by clicking on the ‘Modify’’ icon.
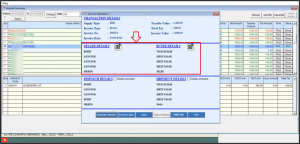
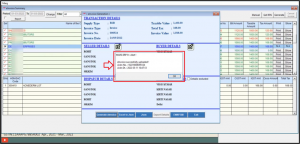
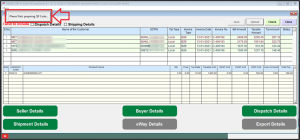
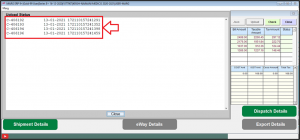
- Then the user can view the Dispatch Details and Shipment Details and can also tick on the checkbox of ‘Details excluded’ as per the requirement.
- Click on ‘Generate eInvoice’ button to upload the selected invoices on e-Invoice Portal.

- Now analert message of ‘e-Invoice Successfully Uploaded’ will appear along with the Acknowledgement No. and Date.
- Click on ‘OK’.
PROCESS TO UPLOAD BULK INVOICES ON E-INVOICE PORTAL
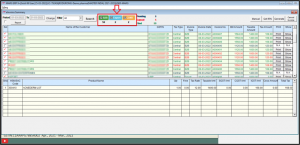
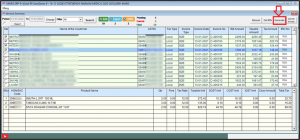
- Go to ‘eInvoice Summary’ window.
- The user can tick on the given checkbox and select all the invoices & upload them.
- The user can also manually select those invoices by ticking on the checkbox which needs to be uploaded of the selected date.
- Click on ‘Generate’ tab.
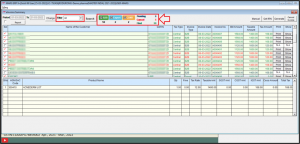
- An alert message of ‘Do you wish to upload Bulk Invoices’ will get displayed.
- Click on ‘Yes’.
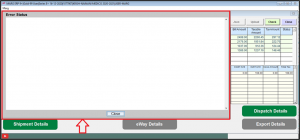
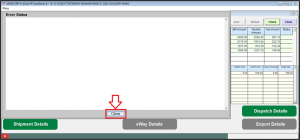
- In order to check that if there are any errors in the invoices which are getting uploaded, the user will click on ‘Check’ button.
- An ‘Error Status’ window will get displayed in which if there will be any errors in the invoices which are getting uploaded then it will be shown here otherwise it will be shown as blank.
- Now click on ‘Close’.
- Then in order to upload the invoices on e-Invoice Portal, click on ‘Upload’ button.
- Now the process of uploading will get started and the bulk invoices will get uploaded on e-Invoice Portal.
- After successfully uploading the invoices, the user will get bill wise acknowledgement no. in the box.
Read Other Useful & Related Content


